Posts

Showing posts from 2016

A pristine Pattern Matching method in Javascript

Whenever it comes to Pattern matching developers have almost always sought JS functions as they provide an easy way to perform pattern matching ranging from numeral and alphanumeric strings to algebraic functions. So though, I'm here to elucidate a more sleek way in which pattern matching can be done in modern JavaScript, I feel that it's crucial to state the predecessor(...maybe not yet!) pattern matching method, that is Regex. Regex Pattern Matching The most common and rudimentary method followed world-wide is the Regex Reference. Regex, that is Regular Expressions, are applied on a character string to check for the existence of a specified pattern. Regex also provides a "match and modify"  functionality, to coin the term. What this means is that we can search for a particular pattern and perform replacement, split, sub-string extractions,etc.  at the same time. The following syntax illustrates the base structure of any regex.           /pattern/modifiers;

AngularJS vs ReactJS

Image
Today I just came across an interesting question and thought of creating this. At many occasions, developers try to render ReactJS as the best over AngularJS. But, according to my personal opinion, this is purely opinionated and also strongly depends on the type of the project in context. First of all, here's a very brief definition of what AngularJS & ReactJS according to their documentations. AngularJS AngularJS is a structural framework for dynamic web apps. It lets you use HTML as your template language and lets you extend HTML's syntax to express your application's components clearly and succinctly. Angular's data binding and dependency injection eliminate much of the code you would otherwise have to write." Here's a perfect example to try out this. ReactJS   React.js is a JavaScript library for building user interfaces. (Famously used by Facebook) The comparison between the two has been jotted out in the following table

interact.js Javascript Library

Image
Previously we've discussed enabling the drag and drop functionalities using the jsPlumb library. Recently, I stumbled upon the interact.js Javascript library, which I found to be as user-friendly as jsPlumb. Below is a short comparison of the two.    Library License Language/Infrastructure Level Built-in editor Github jsPlumb MIT/GPL2 HTML, JavaScript Medium Not Present 2931 stars, 755 forks interact.js MIT Standalone JavaScript Medium Not Present 5452 stars, 351 forks The above details are not presented here to render either one as the bet over the other.  But, in my own experience, I've blended both in my projects utilizing the drag and drop functions for some elements from jsPLumb and the drag and resize function for one element from inter.js. But the only concern when using both the libraries within one function, issues related to the drag function of jsPlumb a

Creating Multi dimensional Arrays in Javascript

Image
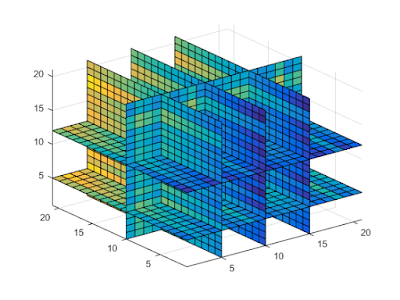
If you asked my opinion about Multidimensional arrays, 3 or 4 years ago, I would have said that they were the most simplistic concept to grasp but the most complicated to implement since this is what pops into my mind as soon as I think of a Multidimensional Array That was ages ago before I discovered the most easiest way, as easy as understanding multidimensional arrays, to implement them. Well, maybe some of you may already be well aware and this might sound like a trivial task, there is a percentage that needs clarification in this concept like I did 4 years ago. So buckle up, here we go. Let's start off with the very basics. What's an Array? The primitive definition of arrays simply stated that " Arrays were a storage medium that could hold a fixed number of values of a single type" . While this is partially true, it not the case anymore. Considering the programming language that I've chosen at hand, I think we can expand this definition an

Deleting Connections when elements are deleted in jsPlumb

Image
Removing the connections along with the parent element can be  little tricky if not correctly handled. This requires the maintenance of information regarding a connections source and target.  In order to do so, we'll be using an array called 'list'. The list array is a two- dimensional array instantiated with the number of connections at the time of deletion of a parent element.  An event listener will be called when the user clicks on the cancel icon of an element, as shown below. (I've tried as far as possible to simplify each and every code line via comments) The reason to declare the list array within the call to delete listener is the fact that there is no viable place other than this that could assure that the user has fully completed connecting as desired, plus there is little to no concern regarding this details up till an element needs to be deleted( up till what we've covered in this context, but the c

Deleting an Element upon button/icon click

Image
Now to spice things up, we'll be adding a delete button that removes the dropped clone from the canvas. This is a fairly easy and simple task. After adding the 'pro' class to a new division and creating the framework for the droppable element, we'll have to append the icon image to the element before it gets appended to th canvas. This is done by piping the append command to the following line. Or it can also be done in a separate command line. var newAgent = $ ( '<div>' ). attr ( 'id' , 'pro' + i ). addClass ( 'pro' ); newAgent . text ( 'Element ' + i ). append ( '<img class="cancel" src="../img/delete.ico"  width="25px" height="25px" />' ) ; //rest of the code Lastly, rather than using a double click to get rid of the clone on the canvas, an event listener is used as follows with pretty much the same internal working to delete the element . ne

Creating a variety of elements in the toolbox (jsPlumb)

Image
Previously we've come up to a point where we can create interactive connections between a single kind of dropped elements. Now, let's move on to creating multiple tools inside the toolbox that can be dropped onto and manipulated within the canvas.  For this example, let's consider two elements since the same method is applicable to any number of tools you wish to include. Step 1:  Create another division within the body section of the view/ html file to hold the draggable element. (query is the new division added here) < div class= "project" id= "cId" > </ div > < div class= "query" id= "rId" > </ div > < div id= "container" > </ div > Step 2: In the stylesheet include the style preferred for this newly created tool/division . query { border-style : outset ; text-align : center ; width : 130 px ; height : 72 px ; background-color : po

Interactive Model creation using jsPlumb

Image
We have been able to create simple connections between elements dropped o the canvas. Her below, we'll be looking at ways to create sub divisions of a single element so that each subdivision will be eligible to connect to another subdivision, either from its own element or from another element. Elements and Classes: dropArea    :    Canvas where elements will be manipulate d connector   :    Subdivision of the element from which a connection will be                        made element      :    The toolbox from which an element will be dragged pro            :     The class that replicated the elements style but not the                        behavior. This will be dropped as a clone on the canvas section       :     Subdivision of the element that indicated the subdivision                        number Sample Model Created  Code : <!doctype html > < html > < head > < script src= "../lib/jquery.min.js" ></ script >

Creating connections between Elements in jsPlumb

In my previous posts we've gone through creating a toolbox and canvas from which elements can be dragged from and dropped onto. Then we took a look at eliminating the replication of elements whenever a dropped clone was dragged within the canvas. So now let's move onto creating basic connections between these dropped elements using jsPlumb and jQuery-UI. Starting off with the code previously dealt with, creating connections requires only the addition of a few lines of code to your JS code. The droppable function part of the code has been shown below. Step 1: Assign a unique ID for each element being dropped on the canvas. Though jsPlumb will automatically assign an ID when you don't supply one, it is easier to manipulate the elements when you define an ID. This ID can be a simple digit or even a complex string( But remember, jsPlumb treats all IDs as strings). //Set a unique ID for each dropped Element var indexer = 0 ; function setId (element){ indexer ++;